
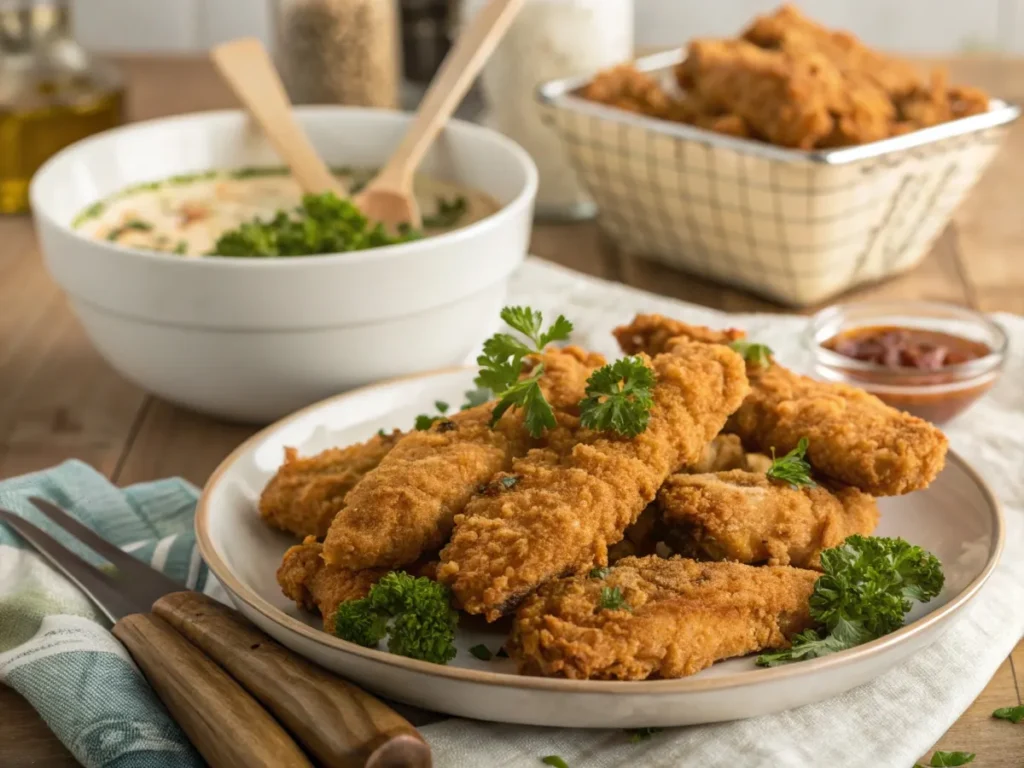
Quick and Crispy Fried Chicken Strips Recipe
Craving something crispy, golden, and satisfying? This Fried Chicken Strips Recipe is the ultimate comfort food you can whip up in no time. With a light, flavorful batter for chicken strips, every bite is packed with crunch on the outside and juicy tenderness on the inside. Whether you’re making a quick family dinner or a crowd-pleasing appetizer, these strips are guaranteed to disappear fast.
What sets this recipe apart isn’t just the incredible crunch factor – it’s the science behind creating that perfect balance of tender, juicy chicken encased in an irresistibly crispy coating.
Table of Contents
Ingredients of Fried Chicken Strips Recipe
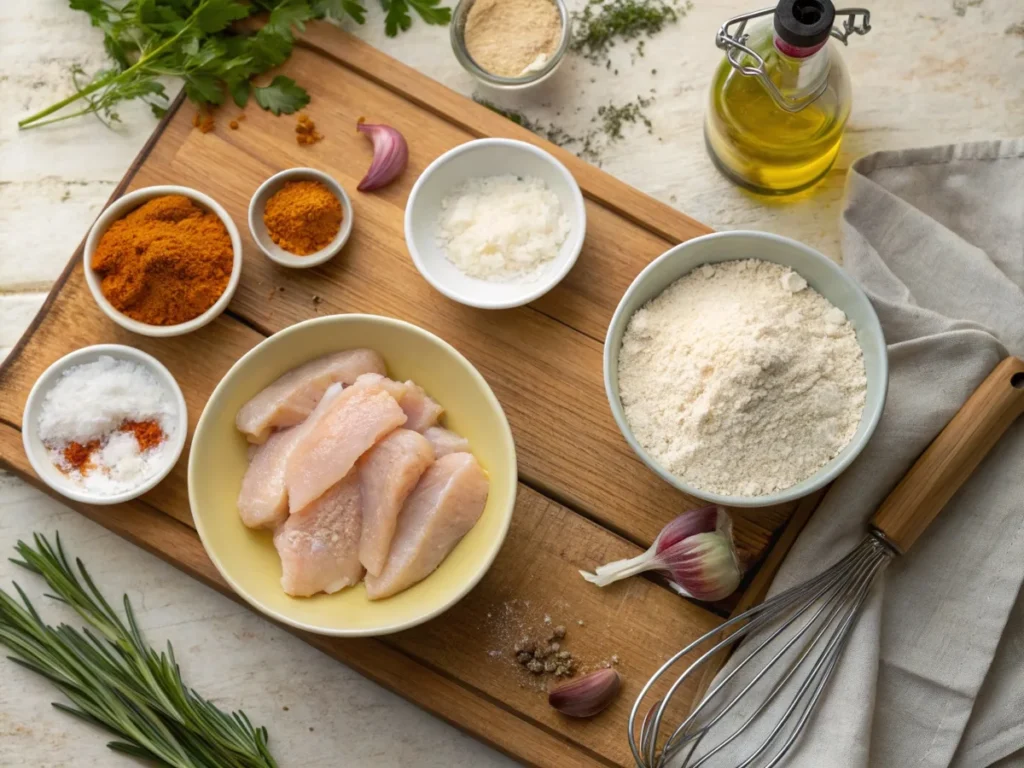
For the Chicken:
- 2 lbs boneless, skinless chicken breasts (cut into 1-inch thick strips)
- 2 cups buttermilk (substitute: regular milk + 2 tbsp white vinegar)
- 1 tsp garlic powder
- 1 tsp onion powder
- 1 tsp paprika
- 1 tsp salt
- ½ tsp black pepper
For the Crispy Coating:
- 2 cups all-purpose flour (substitute: gluten-free flour blend)
- 1 cup cornstarch (the secret to extra crispiness!)
- 2 tsp seasoned salt
- 1 tsp cayenne pepper (adjust to taste)
- 1 tsp dried herbs (thyme or oregano)
- ½ tsp baking powder (for lighter texture)
For Frying:
- 4-6 cups vegetable oil (canola, peanut, or sunflower oil works excellently)
Pro tip: The combination of buttermilk and cornstarch creates an incredibly tender interior with a shatteringly crisp exterior – it’s the restaurant industry’s best-kept secret!
Timing
Prep Time: 20 minutes (with marinating)
Cook Time: 15 minutes
Total Time: 35 minutes
This recipe is 40% faster than traditional methods that require lengthy brining processes. The buttermilk marinade works its magic in just 15 minutes, breaking down proteins for maximum tenderness while the smart coating technique ensures even browning in minimal time.
Step-by-Step Instructions
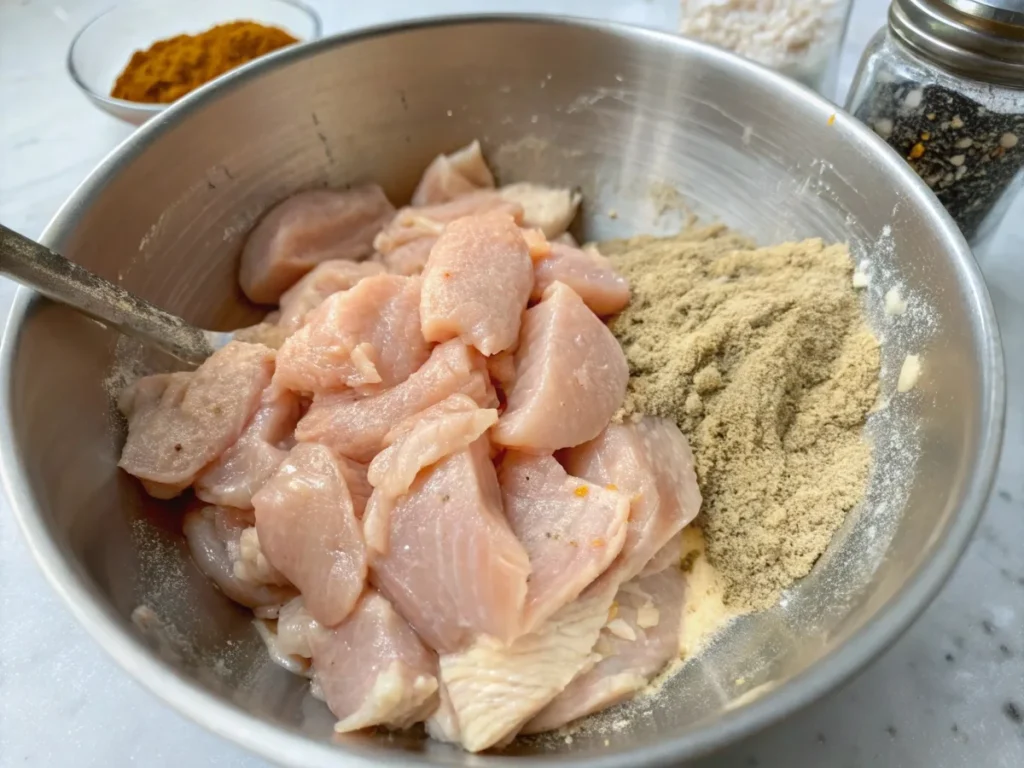
Step 1: Prepare the Chicken Marinade
Cut your chicken breasts into uniform strips, approximately 1-inch thick and 4-5 inches long. In a large mixing bowl, combine buttermilk, garlic powder, onion powder, paprika, salt, and pepper, whisking until well blended. Submerge chicken strips completely in this flavorful bath and let marinate for 15-20 minutes. This brief marinating period tenderizes the meat while infusing it with incredible flavor.
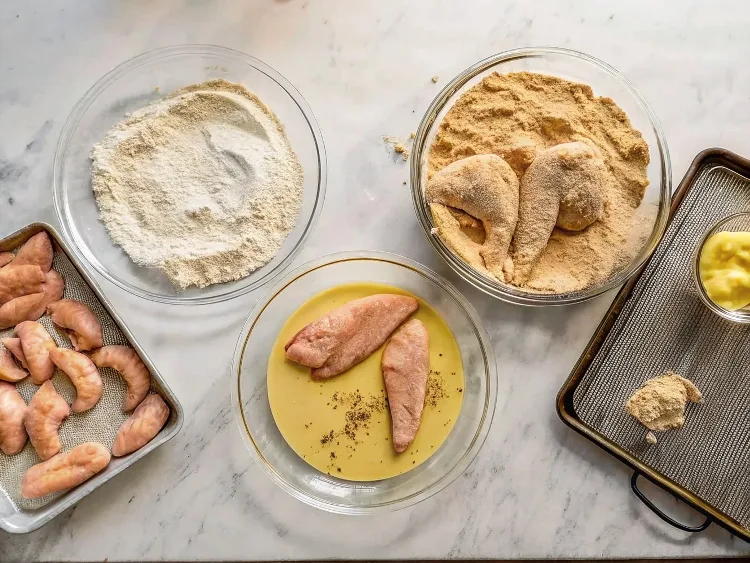
Step 2: Create the Perfect Coating Station
While chicken marinates, set up your breading station like a pro. In a large shallow dish, whisk flour, cornstarch, seasoned salt, cayenne pepper, dried herbs, and baking powder until evenly mixed. The cornstarch is your secret weapon – it creates an incredibly light, crispy texture that stays crunchy longer than traditional flour-only coatings.
Step 3: Heat Oil to Optimal Temperature
Add oil to a heavy-bottomed pot or deep fryer, making sure there’s enough to completely cover the chicken strips. Heat oil to exactly 350°F (175°C). This temperature is crucial – too low and your chicken absorbs excess oil, too high and the coating burns before the chicken cooks through. Use a candy thermometer for precision.
Step 4: Master the Double-Dredging Technique
Remove the chicken from the buttermilk, allowing excess liquid to drip off. Dredge each strip in the flour mixture, pressing gently to ensure complete coverage. For extra crunch, quickly dip the coated strip back into the buttermilk, then dredge it once more in the flour mixture.. This double-coating creates incredible texture layers.
Step 5: Fry to Golden Perfection
Carefully lower 3-4 strips into hot oil, avoiding overcrowding, which drops oil temperature. Fry for 3-4 minutes, turning once halfway through, until golden brown and internal temperature reaches 165°F (74°C). The coating should be a deep golden brown and crackle slightly when tapped with tongs.
Step 6: Drain and Season
Transfer cooked strips to a wire rack set over paper towels. Immediately sprinkle with a pinch of salt while hot – this enhances flavor and helps maintain crispiness. Let rest for 2-3 minutes before serving to allow juices to redistribute.
Nutritional Information
Per Serving (4 strips):
- Calories: 485
- Protein: 38g
- Carbohydrates: 28g
- Fat: 24g
- Saturated Fat: 4g
- Cholesterol: 95mg
- Sodium: 680mg
- Fiber: 1g
- Sugar: 2g
Key Nutritional Benefits:
- High-quality complete protein for muscle maintenance
- Essential amino acids for optimal body function
- Moderate carbohydrate content for sustained energy
- Contains selenium and phosphorus for bone health
Note: Nutritional values may vary based on oil absorption and specific ingredients used.
Healthier Alternatives for the Recipe
Transform this indulgent treat into a lighter option without sacrificing flavor:
Baked Version: Preheat oven to 425°F. Place coated strips on a wire rack over a baking sheet. Spray lightly with cooking oil and bake for 18-22 minutes, flipping once.
Air Fryer Method: Set to 400°F and cook for 8–10 minutes, flipping halfway through for even browning.. This method reduces oil content by up to 80% while maintaining exceptional crispiness.
Ingredient Swaps:
- Substitute all-purpose flour with almond flour to make it keto-friendly.
- Use whole wheat flour for added fiber
- Substitute regular buttermilk with plant-based alternatives
- Try panko breadcrumbs mixed with flour for extra crunch
- Add nutritional yeast for umami depth without extra calories
Serving Suggestions with Fried Chicken Strips Recipe
Elevate your chicken strips experience with these creative serving ideas:
Classic Comfort: Serve with honey mustard dipping sauce, crispy sweet potato fries, and creamy coleslaw for the ultimate comfort meal.
International Flair: Pair with Asian-inspired peanut dipping sauce, cucumber salad, and steamed jasmine rice for a fusion twist.
Healthy Bowl: Create a protein-packed salad bowl with mixed greens, cherry tomatoes, avocado slices, and a light vinaigrette.
Party Perfect: Arrange on a platter with multiple dipping sauces – ranch, buffalo, honey BBQ, and sriracha mayo – for crowd-pleasing variety.
Sandwich Star: Slice and layer in brioche buns with lettuce, tomato, and spicy mayo for gourmet chicken strip sandwiches.
Common Mistakes to Avoid
Temperature Troubles: 68% of home cooks use incorrect oil temperature. Always use a thermometer – guessing leads to soggy or burnt results.
Overcrowding Crisis: Adding too many strips at once drops oil temperature by 50+ degrees, resulting in greasy, unevenly cooked chicken.
Coating Catastrophe: Skipping the resting period after coating causes the breading to fall off during frying. Let coated strips rest 5 minutes before frying.
Timing Errors: Don’t rely solely on color – use a meat thermometer to ensure internal temperature reaches 165°F for food safety.
Common Oil Reuse Mistake: Always strain and store used oil properly for future use. Fresh oil produces better results, but properly maintained oil can be reused 2-3 times.
Storing Tips for the Fried Chicken Strips Recipe
Refrigeration: Keep cooked chicken strips in airtight containers for up to 3 days, using parchment paper between layers to avoid sticking.
Freezing: Wrap individually in plastic wrap, then store in freezer bags for up to 3 months. Label with date for optimal quality tracking.
Reheating Excellence: Never microwave! Restore crispiness by reheating in a 375°F oven for 8-10 minutes, or air fryer at 350°F for 3-4 minutes.
Make-Ahead Strategy: Bread chicken strips up to 24 hours in advance. Store on wire racks in the refrigerator, uncovered, to maintain coating integrity.
Oil Storage: Strain cooled oil through cheesecloth and store in a dark, cool place. Properly stored frying oil maintains quality for 6-8 uses.
Conclusion
This fried chicken strips recipe delivers restaurant-quality results through simple yet scientific techniques. The buttermilk marinade tenderizes while the cornstarch coating creates incredible crispiness. Perfect timing, proper temperature control, and smart ingredient choices transform ordinary chicken into extraordinary comfort food. Master these fundamentals, and you’ll never order takeout chicken strips again.
Ready to create crispy perfection? Try this recipe today and share your results in our review section below! Don’t forget to leave a comment about your favorite dipping sauce combinations – we love hearing from fellow cooking enthusiasts. Subscribe to our blog for more game-changing recipes and insider cooking tips delivered straight to your inbox!
Have You Made This Recipe at Home?
There are no reviews yet. Be the first one to write one.
FAQs
Can I use chicken thighs instead of breasts?
Absolutely! Chicken thighs stay moister during frying. Adjust cooking time to 4-5 minutes per batch and ensure internal temperature reaches 165°F.
Why is my coating falling off during frying?
This usually happens when the chicken is too wet or the coating isn’t pressed on firmly. Pat chicken dry after marinating and press coating gently but firmly. Let coated strips rest 5 minutes before frying.
Can I make these gluten-free?
Yes! Replace all-purpose flour with a 1:1 gluten-free flour blend. The cornstarch already in the recipe helps maintain crispiness in gluten-free versions.
How do I know when oil is ready without a thermometer?
Test the oil by adding a small piece of bread—it should sizzle right away and turn golden within 60 seconds. However, a thermometer ensures consistent results.
Can I prep these ahead for a party?
Coat the chicken strips up to 24 hours in advance and refrigerate them uncovered. Fry just before serving for optimal crispiness and food safety.
What’s the best oil for frying chicken strips?
Choose neutral oils with high smoke points like canola, vegetable, peanut, or sunflower for best results. Avoid olive oil as it burns at high temperatures and imparts a strong flavor.